• Skip to primary navigation
  • Skip to main content
  • Skip to primary sidebar

Presto Sketching

A book to help you think and communicate better with drawing

  • Home
  • About the book
  • About the author
  • Learn
  • Blog

3 ways to add extra impact to figures

06/02/2018 by Ben Crothers

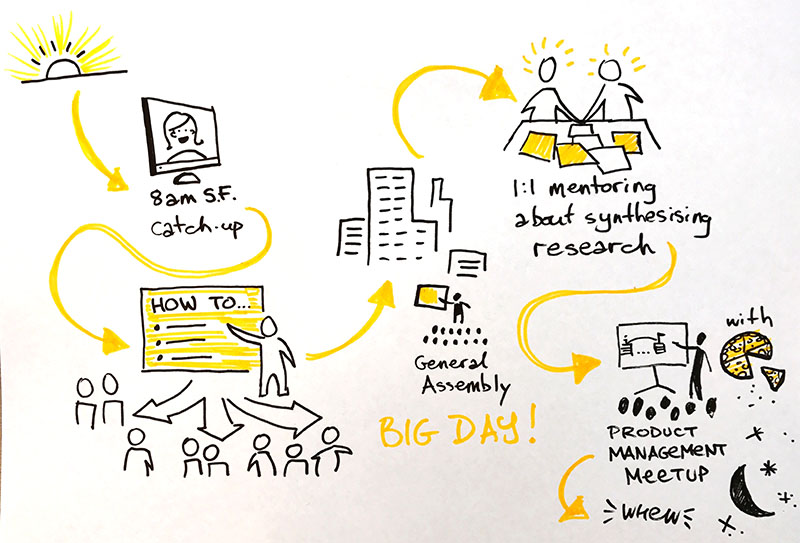
Whether you draw for a living, or you just want to increase engagement in your work by making it more visual (or both!) adding figures and faces to your communications makes a big impact. Our eyes can’t help but lock into the eyes of another face, or the pose of a figure, to seek meaning and affinity.

As well as adding figures, we can also pay attention to enriching those figures with more character and meaning, to boost the impact of your communication:

  • Are you communicating a plan or strategy to the organisation? Add figures to show where and how different teams ‘fit into the picture’.
  • Do you want to highlight a particular product/service problem to stakeholders? Show people being impacted by that problem.
  • Do you want to sell a benefit of a new product or process? Show people being happy when they use it.

Good news: you can draw more interesting figures and faces yourself, and it’s easier than you think. We’re not aiming for anatomically correct works of art here; we’re just aiming for the essence of a figure, or an expression. In this post, I’m going to focus on figures, and show you 3 secrets to drawing more impactful figures.

1. Draw the body language

Most of what we communicate to each other is non-verbal, and a big part of that is through body language. This differs depending on context, but essentially: what we say with our bodies matters. So, the poses of the figures you draw matters, too!

Compare the pairs of figures below. Even though they’re really simple, the second figure of each pair communicates a lot more, doesn’t it? Your figures will have more character and appear more real (no matter how simple they are), which makes your message much more compelling to your viewers.

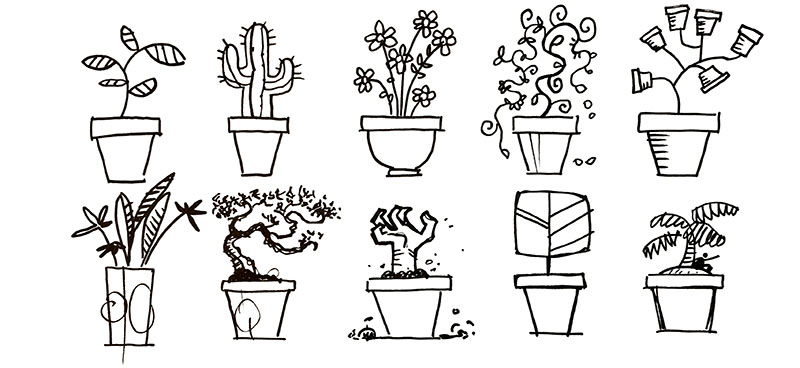
2. Draw people in their natural habitat

Think about where your figure is, and what they’re doing. People rarely just stand bolt upright not doing anything; showing them moving around, slouching, sitting, lying down, or doing various things adds so much more vitality. Add a hint of an accessory or something to add a bit more interest, too. When you use your imagination in your sketching, you’ll ignite your viewers’ imaginations, which will make your message more memorable.

3. Dial up the drama

Use a trick that cartoonists know really well, and try exaggerating the poses of your figures. This works really well when you want to cut through the noise of other communications, and imply drama and urgency.

Your turn

My challenge to you: if you’ve never included your sketches in a presentation or on a whiteboard, try it out, and let me know how it goes! You’ll be pleasantly surprised by the positive attention it gets. And if you’re pretty seasoned at drawing figures at work, then think about how you can add more body language, habitat and drama, for added impact.

Have fun with it!

Filed Under: Fun and creativity, Getting started, Sketchnoting and graphic recording Tagged With: drawing, figures, visual storytelling

Easy ways to show more diversity in your sketches

27/01/2018 by Ben Crothers

Life is full of all kinds of people, and your sketches can be too, with these ideas and examples.

Do you want your presentations and business communications to be more inclusive, and show more diversity, but you don’t want to use those cheesy contrived multi-racial stock photos?

Well, help is here! Let’s look at simple ways to sketch diversity in simple figures and faces for your presentations, and other things like whiteboard drawings in meetings, user interface designs, journey maps, and storyboards.

Let’s back up a minute. What do I mean by ‘diversity’? Rather than every figure in your drawing being a white male, I mean showing a variety of figures and faces, in terms of gender, age and life stage, ethnicity and sociodemographic background. This makes your communications much more inclusive.

“Whoah, Ben!” you might be gasping, “That’s a tall order! I can barely draw a figure that looks human, let alone a variety of humans!” Good news – it’s easier than you think. Once you start doing some simple sketches like these (instead of using hilariously bad stock photography), the greater your confidence will be to share them and use them in your own work.

In sketching, detail and diversity go together

Look at the range of faces below. The more abstract a face, the less you need to worry about diversity, but the more detail you add, the more diversity — or lack thereof — will become an issue. Work on a sketching style (or fidelity) that’s got only a little bit of detail; that way, you can suggest diversity in easy, economical ways.

Think about head shape

All of the examples I show you here are using a low level of fidelity; simple lines, no mouths, that sort of thing. This is great for anything from whiteboard drawings in meetings, to slide presentations and design work. Firstly, think about the shapes of the heads you draw. Almond-shaped heads with slightly pointy chins appear more feminine, squarer-shaped heads appear more masculine. Weird-shaped heads appear alien (hey, we’re being inclusive here, right?).

Hair’s the easiest way to variety

Drawing a variety of hair is the easiest way to indicate a variety of gender, age, and ethnicity. The picture below shows how adding just a simple line here and there can indicate things like plaits, a ponytail, or a bun (a man-bun, maybe?).

Once you master those simple lines, try drawing different shapes and varieties of hair as seen below: young spiky hair, long wavy feminine hair, emo hair with a streak through it, permed hair or balding hair. Close-cropped curly hair is also a good way to show someone whose gender is not identified by hair shape.

Beards, facial hair, and accessories like headbands, glasses, caps and other headwear are also great ways to indicate various nationalities, ethnicities, styles, and ages:

Little details mean a lot for different ethnicities and religions

It’s worth investing a little bit of time practising the faces below, so that you can include different ethnicities and religions in your drawings.

Seen here in the top row from left to right: a Sikh turban (the dastar), a Muslim skullcap (taqiyah or topi), two Indian head coverings (chunni), and an Indian woman with a tikka and sari. In the second row from left to right: a Buddhist wearing a Kasaya, an Asian female (the clothing is simple enough to be a Vietnamese áo dài or a Chinese cheongsam), two hijabs (simple enough to be Al-Amira or Shayla style), and a niqab.

Being more inclusive when sketching figures

Just like the faces above, the figures drawn here are really simple. By thinking about different ages and stages (childhood, parenting, older age), we can add a whole lot more variety to the figures we sketch. Here are just a few examples:

Think about different life situations (like parenthood), and different levels of ability and mobility as well.

One thing I like to think about when doing more inclusive figures like this: even if I do a figure with a walking stick or in a wheelchair, I never want that thing to define them as OLD or DISABLED. That’s a stereotype. Instead, I like to include a little detail to show some character in some way, so that they’re not perceived as a stereotype (e.g. old people use smartphones too! A woman in a wheelchair can zip along pretty fast!).

Similarly to the faces you saw, adding a bit of detail to indicate different dress can indicate more inclusivity too (in the case above, the female figure is wearing a sari and maybe a choli).

Your turn

I hope this helps you think about how you might be more inclusive in the way you draw, wherever you draw, and whatever you draw. And I bet you that everyone around you will really appreciate it, too.

Other things worth reading

  • Representation in graphic recording – a really insightful reasoned article by ImageThink
  • You can’t just draw purple people and call it diversity – an amazing analysis of the unconscious biases that dog us all, and then some, by Meg Robichaud and her drawings she did for Shopify

…

Would you like more of this sort of thing in your inbox every week to help you be more clever, and more valuable to your team? Then why not use that there box at the top right of this page, and sign up to the Presto Sketching newsletter. I send tips out weekly, and I make them as useful as possible.

Filed Under: Fun and creativity, Getting started Tagged With: accessibility, accessories, age, beards, diversity, ethnicities, faces, figures, inclusion

3 ways to visualise psychological safety for better team performance

22/01/2018 by Ben Crothers

Think about you and your team at work for a minute. How supportive would you say it is for everyone to speak their mind, try new things, and learn from mistakes? Is it a pretty open, encouraging team, or is it rife with politics? Do you feel like you can be yourself there?

This is what psychological safety is all about: having a culture where you and your team can bring your whole selves to work, speak your mind with respect for each other, trust each other, be curious, be assured that it’s okay to try new things, and not be penalised speaking out, or for taking small risks. Psychological safety is essential if an organisation wants to have a culture where inventing and implementing breakthrough ideas can thrive.

Using sketching to promote and embed psychological safety

That sounds like a pretty good culture to work in, doesn’t it? So how can you promote and embed that sort of culture? By using more sketching and visualising in your team, of course! Here are 3 ideas to get you going.

1. Draw project ‘horror movie’ posters

I’m a big fan of awesome movie posters, as well as pre-mortem activities, where a team can discuss what they think could go wrong in a project at the beginning of the project, and then discuss what they can do to avoid those things. This is a great way for everyone to be more real with each other, air those anxieties, and be more connected by realising that everyone probably feels the same anxieties.

At the beginning of a project as part of a kick-off meeting, ask everyone to imagine (in silence) the project as a horror movie or disaster movie, where everything they think could go wrong HAS gone wrong. Then, give everyone a sheet of paper and a pencil or marker, and ask them to each draw a promo poster for that movie, showing what has gone wrong.

The drawing doesn’t have to be good at all; just enough to get their idea across. And like all visualisations, just getting those vague thoughts out of people’s heads and out in the open can be really clarifying. You can put everyone at ease by showing them a rough drawing you’ve done yourself, earlier.

Once everyone has finished (after 5 or so minutes), get everyone to stick them up on the wall, and let everyone tell each other about what they’ve drawn. Then, discuss as a team how to avoid those things going wrong. It’s fun, it’s really revealing, and it bonds the team a bit closer together.

2. Do a ‘Circle of expectations’ sketch

Another good activity to do during a project kick-off, or whenever someone new starts on the team, is to do a ‘Circle of expectations’ sketch. Draw a big circle on a whiteboard, and write ‘IN’ in it. Outside the circle on one side, write ‘OUT’.

Set the scene by saying that everyone has a part to play in the culture of the team, and this is the opportunity to state what behaviour expectations we all have. It’s a good idea to demonstrate what you’d like everyone else to do, so go ahead and write something like ‘WE DO THE TASKS WE SAY WE’LL DO’ inside the circle.

Ask everyone to grab a whiteboard marker and write what behaviour they think everyone should have in the team inside the circle. And then ask everyone to write what they don’t want outside the circle.

Discuss as a group how to make sure that everyone does what is inside the circle, and avoid what’s outside the circle. This is a great way to foster honesty, and having each others’ backs.

3. Draw a superhero drawing of yourself

This is a fun and very insightful 15-minute ice-breaker activity to do with your team. Ask everyone to draw a simple outline of a superhero on a sheet of paper (you can use something like the image below as a template if you want).

  • Ask everyone to imagine themselves as a superhero, and then write or draw their own SUPER POWERS around the outline. It’s totally fine to be a bit silly with this; it gives people a chance to get past any awkwardness about drawing and sharing this sort of stuff.
  • Then, ask people to write or draw what they really value inside the outline; this is the POWER SOURCE of you as a superhero. You might want to drop hints by including things like authenticity, honesty… things that reveal what really motivates you.
  • Thirdly, ask everyone to write or draw their KRYPTONITE, the things that make you anxious, annoyed…the things that sap your mojo.

As with all of these activities, get everyone to talk through what they’ve drawn, and discuss as a group how you can support each other to stay connected to your power sources, use your super powers to help each other, and avoid the kryptonites.

Your turn

The only way these activities will bring better psychological safety to your team is for you to actually do them. Maybe try them alone first to get the hang of them, and then do them with your team. I’ve used these over and over again, I’ve seen them bring great benefit to teams, and I guarantee you that they will improve your team’s psychological safety too.

So if you do try any of these activities with your team, let me know, send me a photo… it’d be great to hear how they’ve worked for you!

Filed Under: For meeting leaders and coaches, For project managers and facilitators, Fun and creativity Tagged With: camaraderie, check-ins, coaching, drawing, facilitation, group drawing, teams, visual metaphor, visual thinking

5 easy ways to give your sketches more WOW factor

04/01/2018 by Ben Crothers

Have you been working away on improving your sketching, and looking for ways to up your game a little? If that’s the case, grab a marker and some paper, and try these 5 easy ways to add more life and character to your sketches. Actually, it’s more like 5.5 ways… You’ll see…

1. Add a dash of detail that tells a story

Surprise is always a great trick to help embed your message or idea deeper into your viewers’ brains. Push your powers of imagination a little further, and add something fresh and unexpected to an otherwise regular icon to enhance the meaning, or hint at a story.

2. Make it move

Sketching things that look like they’re moving always adds energy. What would the thing you’re sketching look like if it were stretching, or bouncing? Wiggling, or racing ahead at break-neck pace?

3. Excite the eyes with some EXAGGERATION!

Whatever you’re sketching, think: what could I exaggerate to add more interest? Think about the relative size of some parts, or the pose of a figure, or even the texture of an object.

4. Snazz it up with a splash of colour

Any sketch is going to be more eye-catching with a splash of colour. You don’t have to go overboard; even just one colour can turn a humble hat from “ho-hum” to “HUZZAH!”

It’s worth paying attention to the way you apply the colour: strong decisive areas and lines are much more visually appealing than thin scratchy marks.

And here’s the bonus half a tip: dial up the contrast with areas of black, or dark colour. Our eyes are drawn to areas of high contrast; if you’re sketching in black, don’t be afraid of using strong areas of black. This will really make your sketches more eye-catching.

5. Put a face on it

Ever since I saw that Portlandia episode, I’ve always remembered that phrase “Put a bird on it!”. Just like putting a picture of a bird on any objet de home décor makes it more hipster, putting a face on any inanimate object instantly adds charm and character.

Here’s the magic: we can’t help seeing faces in things, and as soon as we see a face on something, we can’t help but attribute a personality to it, depending on the face’s expression. So, make your sketches and whiteboard drawings instantly more fun, attention-grabbing and memorable with faces!

Try these tricks out today. The more you bring life, story and character to your sketches, the more people will take notice of them, and the more they’ll remember them, and therefore the more they’ll remember your message and your ideas.

Have fun with it, and don’t be shy about letting me know how you went with applying these tips.

Filed Under: Fun and creativity, Sketchnoting and graphic recording Tagged With: drawing, visual storytelling

10 ideas to get you inspired to sketch

28/08/2017 by Ben Crothers

You want to sketch more…or just start sketching… but it’s hard to know where to start. I hear you. Here’s 10 things to draw, when you don’t know what to draw.

I know what it’s like. You want to sketch (or you want to sketch more often), but you can’t really think of what to sketch, so it’s just really hard to get started. Or you’re looking at other sketches you see, and you can’t help thinking that you have to sketch like that first time, which holds you back as well.

A big part of just getting going is saying to yourself that whatever you sketch is not going to be perfect. It’s just not. But it can be not perfect and still be satisfying! That awesome sketch by someone else you saw on that Instagram post? That’s sketch No. 10 or 11. You’re never going see sketches No. 1 to No. 9, because they were too crappy to show to the world. But sketches No. 1 to No. 9 had to happen first, to get to that awesome sketch No. 10.

So with that in mind, here we go: 10 ideas for what to draw when you don’t know what to draw.

1. Get your Kandinsky on

Start with a fresh sheet of paper, or a fresh page in your sketchbook. Take your marker or pencil of choice, and let your hand draw some flowy curly lines around the page. Draw some straight lines, too. Then, colour in (or make some parallel line marks) in all the little spaces enclosed by the lines. And behold! You’re an Abstract Expressionist!

You too can be an Abstract Expressionist, like Vasily Kandinsky (painting shown: Composition 8, Solomon R. Guggenheim Museum, New York, Solomon R. Guggenheim Founding Collection, © 2017 Artists Rights Society (ARS), New York/ADAGP, Paris)

If someone gives you funny looks while you do this on the train, just tell them you’re studying the renowned Russian Abstract Expressionist Vasily Kandinsky, who did this sort of thing all the time (that’s his Composition 8 in the image above, painted in 1923).

2. Find meaning in the scribbles 

This is another idea to help you park your own self-judgement, and to just get going drawing something. Start with your marker in the middle of a fresh blank page, and just do loose scribbles for a minute or two, without taking your marker off the page. It’s better if you don’t even look at what you’re drawing. Make sure you fill the page. Then, look at what you’ve drawn, and see if you can find some meaningful shapes among the scribbles. Is that a face there? Or a rabbit? Whatever you find, make them stand out more by outlining them with your marker. Fun, hey?

Here’s my example. What can you see in the scribbles? I saw a weird horse-like thing, a dude with angel wings, and a ribbon of some sort.

3. Sketch 3D crystal patterns

This is another idea to help you replace self-judgement with a sense of creativity and discovery. Fill the middle of the paper with some randomly-placed dots. Connect the dots in a way that makes lots of triangles and other random 4- or 5-sided shapes. Then, shade some of the shapes in a mid tone, and some other shapes in a darker tone. Before long, you might see a weird crystalline shape emerge, like these 3D crystal phone covers.

4. Sketch a wine bottle 5 times

Alright, let’s move on into sketching actual things. This one’s about giving your hand a chance to practice rendering what you ‘see’ in your head. Draw a wine bottle. It can be as sloppy as you want. Then draw another, and another, and so on. Each time, pay more attention to the quality of the line. Your wine bottle number 5 is better than number 1, isn’t it?

5. Sketch different sorts of pot plants

This is a simple and fun one. Sketch different sorts of plants in pots. They can be simple or complex, beautiful or ugly, regular or hipster… it’s just a chance for you to draw a similar thing over and over, and inject a little bit of creativity or a lot!

6. Look at all the trophies you won!

Time for a motivational one. What’s something you want to be famous for? Sketch a trophy for that thing, with your name on it. What’s something you want to achieve at work? Write that down, add your name, and sketch a trophy around it. Don’t worry, no-one else is going to see these trophies; it’s just a really good idea to visualise your goals to help you make them happen.

7. Try a bit of Zentangling

Zentangles are abstract creative drawings that are made by sketching random creative patterns. They can start with a real-life object, or they can be completely abstract… it’s up to you. Draw a simple object (fairly large on the paper), like a fish, a tree, a figure, headphones…it could be something that’s sitting right next to you, or something you’re thinking about. Then, sketch in a few structural lines inside any of the larger shapes of your drawing, as if it’s made out of a wooden frame. Then, fill each shape with random lines, loops, circles… wherever your hand takes you! Loads of fun.

This page on WikiHow is a nice place to help you learn more about this absorbing way of sketching.

8. Visualise your day as a flow sketch

Take a look at your calendar for today. What sort of day are you going to have? Or what sort of day did you have? Using a fresh page, draw each event as a small picture of some sort, moving from one side of the page to another. You could just sketch symbols (like stars and boxes), or you could sketch simple icon-like pictures (like people in a meeting, or a document, and so on), it’s up to you. Then, connect the pictures together in a way that shows the flow of your day.

9. Sketch skylines

Sketches of skylines are really fun. They can be fairly complex and detailed, but even just light simple silhouettes just look crazy cool. Wherever you’re at — on the bus, at home, at work — look outside at the skyline, and draw it. If you want to enhance it a bit with extra buildings (or UFOs and Godzillas), that’s cool too.

10. Sketch something from your social media stream

Do you spend time thumbing through social media streams of images and updates, like on Instagram, Facebook, and so on? Stop at a particular image you like, and sketch it. Remember, your sketch doesn’t have to be good, just sketch it anyway. Do this a few times, and try not to keep thumbing through looking for an ‘easy’ one, or a ‘cool’ one. Just sketch a few.

This is sketch of a photo of my mate Josh Stinton and his buddies, who have just completed a 190k mountain bike race in the Arctic, to raise money for charity. Amazing!

And there you have it! 10 ideas to get you sketching, and sketching more often. As always, drop me a line if this has been useful for you. I’ve got bags and bags of ideas like this, so if you want 10 more ideas, let me know, too.

Filed Under: Fun and creativity, Getting started Tagged With: creativity, inspiration, practice, zentangle

Use the Product Box sketch to improve any product or service

10/07/2017 by Ben Crothers

Picture yourself strolling down the aisle of your local supermarket, looking at the various products on the shelves. What catches your eye? What is it about the boxes, packaging and labels that gets that product into your trolley?

Not many of us get to design those boxes and packaging, but imagine if you got to do exactly that for your business, product or service?

Or imagine if you got to design a box for you?

That’s exactly what this Product Box sketch trick is all about. It’s a way to help you think about whatever it is that you’re selling, from a fresh point of view. You use the visual ‘language’ of boxed product design (like a box of cereal) as a way to express your product’s value to customers. And it goes a bit like this:

Decide on what it is that you want to sell. As an example, I’m going to use ‘Project Manager’ (I was having a conversation with a friend the other day about how she’s trying to help her team understand how a project manager can help them).

1. Start the box

Sketch a nice big rectangle. This is going to be the front of your boxed product.

2. Sketch the front of the box

Now it’s time to start getting creative! Write the name of the ‘product’ at the top of the box in nice big letters (in my case it\’s ‘Project Manager’), and sketch whatever your product is. Make sure you leave some area blank for the next step. Note how I\’m keeping my sketching really simple:

3. Add the benefits

Next, think about the benefits of your product. What’s your product going to do for your customers? Why should they care? Write those benefits on the front of the box, too (up to 3 benefits is fine). Try not to agonise over the benefits (or your sketching) too much. Progress is better than perfection at this point!

4. Add the ‘ingredients’

Now, let’s get 3D: draw a bit of a parallelogram on one side of your ‘box’. This is the side of the box where your ‘ingredients’ go. This can be the main features of your product; the sort of things that customers want to check that your product includes, when they’re comparing your product with others. Go ahead and write whatever those ‘ingredients’ are.

5. ‘Open here’

Finish off the box by drawing the top (like you can see below). Add in something about how customers start using your product. Do they just open the box and away they go? Or do you want to add the price?

6. Refine your design

As you sketch this ‘product box’, you may well have more ideas about how to make it better. You might also get into the metaphor of the product box a bit more too, and you might want to riff off product-y things like ‘batteries not included’, or ‘assembly instructions’, and so on. Go ahead and do another sketch, and work in your refinements. Here’s mine:

And there you have it! It’s amazing how often we forget to think about our business, our product, our service — whatever it is — from a customer’s point of view, and the product box is a great metaphor for getting us thinking differently. Here are some ways you can use this Product Box sketch as an activity:

  • Help you and your team get a shared understanding about what your product/service is now
  • Help you and your team think in a fresh way about what it could become
  • Galvanize your team, and get them thinking about their internal value to your organization in a new way
  • Help you think about yourself. What value do you want to be in the world? Why should people ‘buy’ you?
  • Sharpen up your resume: what are the benefits to your new employer if they were to give you the job?

So, give the Product Box sketch a go, first by yourself and then with your team. As always, let me know if you try it out, and how it went.

Filed Under: For designers and researchers, For project managers and facilitators, Problem solving, Visual strategy and facilitation Tagged With: design, product design, product management, product strategy, ux, visual metaphor

Amaze your team mates with radar charts

03/07/2017 by Ben Crothers

If you’ve been reading this blog for a while, by now you know that I’m keen on helping you use simple sketching in your work, to explore problems, explain concepts, and generate ideas. I cover a range of topics, including drawing icons, whiteboarding, making meetings more effective, exploring problems and plans with metaphor, and visualising data.

This post looks at a particular data visualisation pattern that is really useful but often gets forgotten.

Step forward if you would, radar chart, a.k.a. spider chart, star chart or polar chart. The radar chart is great for plotting multivariate data, or in other words: those times where there is more than one value or factor that you need to measure and compare. Plus, they just look really cool.

And they look a bit like this (left) or this (right):

Snazzy, hey? Each value you’re measuring has an axis that radiates out from a point (typically of value zero), with equivalent increments along each axis. Radar charts give you a much more compelling way of looking at data, rather than just in a table. Let’s take a look at where you can use radar charts, shall we?

Great for analysing products

Are you a product manager, researcher or designer? You’ll know that you can’t judge your product’s performance on just one metric; there might be a range of heuristics that you use, to do with usability, customer satisfaction, up-time, task completion speed, and so on. And sometimes these are a bit semi-quantitative, and a bit hard to hook a definite number on. Radar charts give you the flexibility to use other values like ‘high’, ‘medium’ and ‘low’, or ‘happy’, ‘meh’, and ‘anxious.

Here’s an example from a fictional social media website, where you can see how user satisfaction is rating for four major functions of the website:

Great for analysing you

Are you working on your own professional development? Plotting your skills on a radar chart is a quick and engaging way to see where you’re at now, and where you want to grow. Here’s another fictional example, using a mix of user experience designer skills:

Great for analysing staff and teams

Sports players and coaches have used radar charts to analyse players and teams for ages (and if bringing data and sports together is pure nerdy heaven for you, check out these charts for hockey and soccer/football!) This visual way of assessing team members’ skills is really handy for candidate interviewing in recruitment, and for helping team members to balance where they want to grow, and where the team needs skills.

What’s really nifty is that you can overlay several team members on the same radar chart, to build up a story of aggregate sets of skills in a team:

In the example above, we can instantly see the different levels of ability in teamwork, design and sketching, as well as where these two team members are complementary. Plus, this also helps us see that we don’t have much by way of development ability in the team.

So there you have it; aren’t radar charts amazing? Start using them by analysing yourself and your skills, then see how you can apply them in other areas of your work.

Filed Under: For designers and researchers, Problem solving Tagged With: charts, data visualisation, self-improvement

5 MORE tips for better whiteboarding awesomeness

29/05/2017 by Ben Crothers

My last post about whiteboard tips seemed to really strike a chord with a lot of readers, so here for your further whiteboard mastering pleasure are 5 MORE tips. If you missed out on the first 5, don’t worry; you can read them here.

There’s no harm in saying again that writing and drawing on a whiteboard is not only a great way to visually reflect what’s being said in the meeting, it’s a great way to command the meeting. By that I don’t mean making YOU the centre of attention; I mean making the IDEA, or the QUESTION, or the DECISION the centre of attention.

So, here are 5 more ways you can rock the whiteboard, to make sure everyone in the meeting focuses on what really matters.

1: Plan the structure  of your whiteboard space

It’s really easy to let a meeting take your hand all over the whiteboard. Before you know it, you’ve scrawled willy-nilly all over it like a bee on Red Bull, darting from flower to flower. This might feel good, in a Beautiful Mind aren’t-we-brilliant kind of way, but it may not help everyone in the meeting to get more clarity, meaning, structure, and connection from what’s being discussed.

Instead, plan the spatial structure of what you’re going to write and draw on your whiteboard ahead of time. Using either a dashed line, or just your mind’s eye, mark out a set of smaller areas on the whiteboard, where each area will correspond to a particular part of the meeting or workshop, like this:

This will help everyone understand and remember the various parts of the meeting much better. Also, try to make the shapes photo-friendly, to make taking photos of them easier (see point #5 below).

2: Use colour to add meaning and emphasis

Now, I’m assuming you’ve done tip #2 of the last 5 tips for whiteboarding awesomeness, and you have several good-quality whiteboard markers in several colours at the ready. Choose one marker for the bulk of what you write and draw (hint: black), and then choose a colour or two to use with the black, to represent specific meaning(s).

In the example below, I’ve used red to emphasise some elements of an outcomes hierarchy that I would need the room of people to pay attention to:

In this example, the red emphasises 3 things at a glance: There’s a box in the bottom right corner that isn’t connected to anything (this could represent a project that isn’t contributing any outcomes); another project added to the left that we’ve forgotten about; and the highest-level outcome is in a warning-state somehow.

3: Breathe life into those boxes and arrows

If I had a dollar for every box and arrow I’ve ever drawn on a whiteboard, I could definitely buy an island right now, and I’m guessing you’d probably be on your way, too. Boxes and arrows are the bread-and-butter of whiteboard discussions, so why not give them a lot more life and meaning?

You’re probably used to sketching something like this on your whiteboard, or seen it done:

But what if you did something like this:

There are several extra things going on here:

The shape of the arrows adds more meaning – The middle arrow is in a spiral, indicating something that’s either iterative, or complex, or just plain dizzy. The top arrow arcs up and over, indicating a part of the process that soars over the rest, leading to a positive outcome.

The boxes have character – Simply adding a face to a box gives it life, character, and meaning. Depending on what you want to communicate, this sort of tip can be a powerful ally for helping people to remember certain concepts and ideas.

Colour is used to indicate meaning – Red is used for something unfavourable, while green is used for something – well – good!

4: Give them the pen

According to maestro visual communicator and author Dan Roam (and I’ve seen this in action myself), there are 3 types of people in the room when it comes to whiteboards:

  • The Black Pen People – they can’t WAIT to jump up and start drawing on that whiteboard (me!)
  • The Yellow Pen People – they’re happy to hang back a bit, and add to someone else’s work
  • The Red Pen People – they wait until the end, question it all, and might just jump up and re-draw it all

It’s really useful to know what sort of Pen People you have in your meeting, because you can use that to your advantage. For brevity, I’m going to focus on the Yellow Pen People, since they’re the ones who will give a lot of value to a meeting through visual communication, if nudged in the right way.

Here’s how. On your whiteboard, draw things that let the Yellow Pen people easily see where they can add their bit to, give them the pen, and then ask them questions. Here are a few examples:

  • Sliding scales – Draw: a sliding scale, with an alternative at either end // Ask: “Is this a low-risk move or a high-risk move? Where do you think a circle should be on this risk scale?”
  • Fill in the gaps – Draw: a set of circles representing the set of whatever you’re talking about (e.g. projects) // Ask: “Are there any projects missing? Could you draw any more in?”
  • Make connections – Draw: a set of circles representing the set of whatever you’re talking about // Ask: “How are these connected? Could you draw lines in where you think the connections are?”

5: Capture those whiteboard drawings clean and fast

It stands to reason, the sooner you can get a good clean picture of the whiteboard into your team members’ (or stakeholders’) inboxes, the better. The more you use images that they’ve seen before to reinforce what was talked about or decided, the greater your influence will be.

Thankfully, there are some great (and free) smartphone apps out there that will take a great photo, clean it up and send it to your inbox in a jiffy. My current favourites:

  • Microsoft Office Lens (for iOS, Android or Microsoft)
  • CamScanner (for iOS or Android)
  • Adobe Capture (iOS and Android)

You can read a whole lot more about capturing your whiteboard drawings in this Presto Sketching blog post: Capture photos of your sketches like a pro.

Well, there you have it! 5 more tips that I hope will really improve your whiteboarding skills, as well as the meetings and workshops that you and your team have. Let me know in if and how you put these tips into practice, and if they’ve improved your meetings.

Filed Under: For meeting leaders and coaches, For project managers and facilitators, Getting started, Visual strategy and facilitation Tagged With: facilitation, meetings, tips and tricks, whiteboarding

5 tips for better whiteboarding awesomeness

12/05/2017 by Ben Crothers

No-one likes boring aimless meetings, or long wordy slide decks, and a big way to make meetings much more engaging is to use a whiteboard. Writing and drawing on a whiteboard is a great way to visually reflect what’s being said in the meeting. In a way, the whiteboard becomes your second voice in the room.

No matter what you think your ability at the whiteboard is, here are 5 ways you can take your own whiteboarding skills from good to great.

1: SLOW DOWN

Drawing on a whiteboard is a lot like public speaking: if we rush it, we won’t sound very confident in our ideas, what we draw will look like an unruly mess, and others won’t be as confident in our ideas either. How often have you seen this sort of thing on the whiteboard, scratched your head and wondered what it was:

Just slow down. Slow. Down. Breathe. Spend just a few extra seconds as you draw, and be more deliberate with each line. It will inject so much more confidence in what you draw and what you say. And when you project more confidence, others will have more confidence in your ideas. And they’ll remember them longer, too. Try to aim for something that’s just a bit neater, like this:

2: Get decent whiteboard markers

There are a lot of really ordinary whiteboard markers out there, and they do you and your ideas no justice at all. Let the ink speak to the quality of your ideas, and get a set of decent markers that don’t run out by the end of the meeting. Chances are, there’s a newsagent or office supplies store near you that has a range of markers to choose from, for less than the price of a cup of coffee. My favourite tends to be a chisel-tip marker (rather than a bullet tip), so I get a chunkier line:

3: Practice your writing

This is related to tip #1: be a little more deliberate and neat with your writing. What you write is like your voice recorded on that whiteboard long after you’re not in the room, so it’s worth putting a bit of effort into your lettering.\

We’re not aiming for precise calligraphy with graceful ligatures and flourishes, of course! But just a bit of neatness goes a long way to projecting more of your character, and more of that confidence. Try practicing on the whiteboard before the meeting, in both lowercase and capitals:

4: Master outline text

Outline text is eye-catching and, used sparingly as a title or two on your whiteboard, will command attention and inject a little more life and energy into the meeting, for very little effort. It’s best to practice beforehand, if you’re not confident. The best way I know to get good at outline text is to draw each letter in capitals first (with plenty of breathing room between the letters), draw an outline around it, and then rub out the first line:

5: Master a small set of icons

Try to practice a small set of simple icon-like pictures that you’re likely to use over and over, from meeting to meeting. You might like to start with some like the ones below, that represent things like goal, problem, process, conversation, security, company, options, and so on.

These tips will really take what you draw on the whiteboard to the next level, and inject more confidence and life into what you have to say, so why not try them in your very next meeting?

Let me know if and how you’ve put these tips into practice, or maybe a share a killer tip of your own. Here’s to better whiteboarding, and better meetings!

Filed Under: For meeting leaders and coaches, For project managers and facilitators, Getting started, Sketchnoting and graphic recording, Visual strategy and facilitation Tagged With: meetings, tips and tricks, whiteboarding

Sketch the resource Tank for better team efficiency

05/05/2017 by Ben Crothers

I’m sure you know the feeling of being absolutely overwhelmed. You’ve got so many things going on in your head, and then one extra simple thing comes along, and you’re just flummoxed. Stressed. Jammed. Stuck.

Welcome to cognitive overload.

Not fun, is it? But hey, aren’t you glad there’s a sketch you can try, to visualise all those things, and then work out how to make sense of it all? I know, right?

The Resource Tank visual framework

I’d like to introduce you to my friend the Resource Tank sketch, and it basically looks like this:

You draw a tank, with a wavy line to show that it’s full of liquid, and then some straws coming out of it, going to various things that are drawing on that resource. The resource itself – the liquid in the tank – can be different things, like fuel, or time, or attention, or patience, or money.

When we run into a problem, or have to make a decision, it draws from our ‘cognitive fuel tank’. A few things or a few decisions are okay, but when there are more and more, it can drain us dry. Visualising it on paper (or on a whiteboard) like this is a great way to bring all those unseen things out of the fog of your mind and into the light, and then think about what we can do about them. But wait, there’s more:

By putting levels in your ‘tank’, and straws that go to different depths, you can also explore how different things can drain more of the resource, whether we want them to or not. This is a really neat visual metaphor that you can adapt and use in a variety of ways, e.g.:

My ‘attention map’ – what are the things that matter the most to you? There should always be ‘fuel’ for those things, which is why they get the deepest straw. There are things that matter a lot less, so we should only let them have a shallow straw.

Budget and expenses comparison – what would it look like if you compared what your budget expenditure should be, to what it actually is? Are there types of expenses that are crowding out other types, draining resources away from the things that matter?

Team resources and expenditure comparison – What would the fuel tank look like if it were your team? Say you manage a support team; are you leaving enough fuel in the tank for your premium clients? Or is energy being sapped by lots of seemingly urgent and important tasks?

These are just a few examples of how you can use the Resource Tank visual framework, and I’m sure that if you applied it to your own situation, you could probably think of (and sketch!) some more. Whatever happens, we all want to move away from this situation (below)!

So have a go, and have a think about how deep all of those straws are sinking into your valuable energy and attention, and then have a think about what changes you could make to set those straws at more – ahem – fuel-efficient levels!

Filed Under: For meeting leaders and coaches, For project managers and facilitators, Problem solving, Visual strategy and facilitation Tagged With: coaching, productivity, visual framework, visual metaphor

  • « Go to Previous Page
  • Page 1
  • Page 2
  • Page 3
  • Page 4
  • Go to Next Page »

Primary Sidebar

Recent Posts

  • Draw more creatively with FLARE
  • How adding a graphic recorder to your event makes it a game changer
  • Volume 2 of Journey Mapping Icons out now!
  • How to construct a great story
  • Why your project needs storyboarding

Categories

  • For designers and researchers
  • For meeting leaders and coaches
  • For project managers and facilitators
  • Fun and creativity
  • Getting started
  • Problem solving
  • Sketchnoting and graphic recording
  • Visual strategy and facilitation

Archives

  • July 2025
  • June 2025
  • September 2024
  • May 2023
  • August 2022
  • January 2021
  • October 2020
  • December 2019
  • September 2019
  • June 2019
  • January 2019
  • October 2018
  • September 2018
  • August 2018
  • May 2018
  • February 2018
  • January 2018
  • August 2017
  • July 2017
  • May 2017
  • April 2017
  • March 2017
  • Home
  • About the book
  • About the author
  • Learn
  • Presto Sketching Blog

© 2025 Ben Crothers, author of Presto Sketching - a book to help you think and communicate better with drawing.